Welcome to Salesforce, the world’s #1 CRM platform! 🌟 Follow these steps to get your account up and running. Let’s get started! how to create salesforce account ? Learn how to create an account on Salesforce with this step-by-step beginner’s guide. Discover the process of signing up, choosing an edition, and getting started with Salesforce’s powerful CRM tools.
🖥️ Step 1: Visit the Salesforce Website 🌐

- Open your web browser and go to the Salesforce website 🌍.
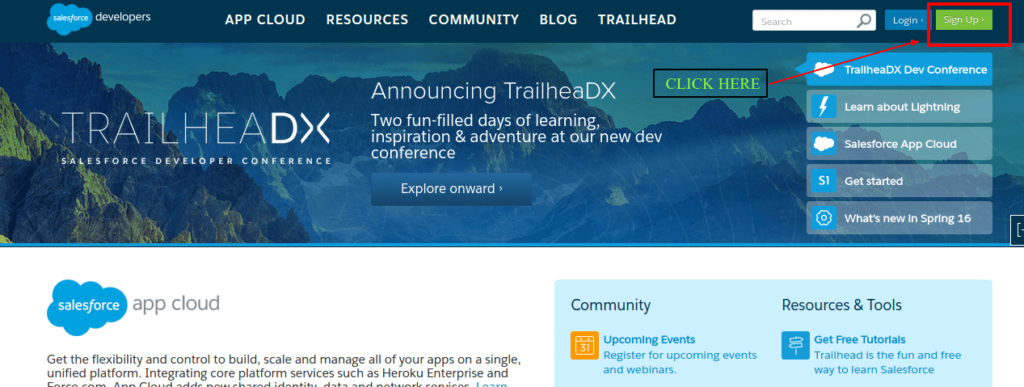
- Click on the “Sign Up” or “Try for Free” button. It’s usually found at the top right corner of the page. 🖱️
📧 Step 2: Choose Your Sign-Up Option 📝

- Select Your Edition: Salesforce offers different editions for various needs. Choose the one that suits you best, whether it’s for small business or enterprise. 🏢
- Provide Your Information: Fill in the required details:
- Full Name: Enter your first and last name. 👤
- Email Address: Use a valid email address where you can receive confirmation and updates. 📧
- Phone Number: Enter a phone number where Salesforce can reach you if needed. 📞
- Company Name: Enter your company’s name, or if you’re an individual, you can put “Personal” or “Self-Employed”. 🏢
- Number of Employees: Choose the size of your organization. 🏢
🔒 Step 3: Create Your Password 🔑

- Set a Strong Password: Create a password that includes a mix of uppercase letters, lowercase letters, numbers, and special characters. For example,
P@ssw0rd2024!. 💪 - Confirm Your Password: Enter the same password again to confirm it. 🔄
📜 Step 4: Accept the Terms and Conditions ✅
- Review the Terms: Take a moment to read through Salesforce’s terms and conditions and privacy policy. 📜
- Agree: Check the box to agree to the terms and conditions. ✅
✨ Step 5: Complete the Sign-Up 🆗
- Submit Your Information: Click on the “Sign Up” or “Get Started” button to complete your registration. 🎉
- Verify Your Email: Check your email inbox for a verification email from Salesforce. 📬 Click the verification link provided in the email to confirm your account. 🔗
🚀 Step 6: Log In and Explore 🔍

- Log In: Return to the Salesforce website and click on “Login” at the top right. Enter your email address and password to log in. 🔑
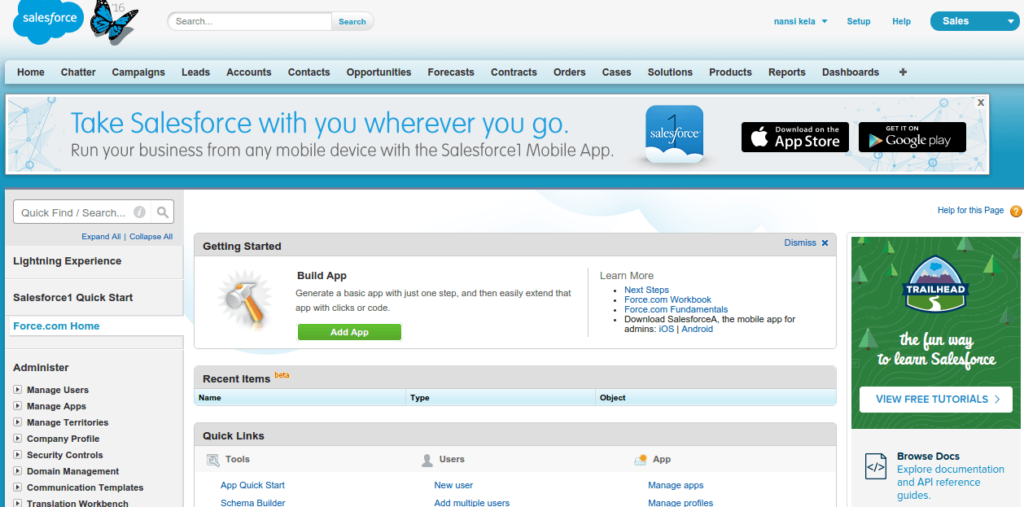
- Explore: Once logged in, you’ll be taken to your Salesforce dashboard. Take a tour of the features and start exploring the powerful tools Salesforce offers! 🛠️
🎉 Congratulations! You now have a Salesforce account. Dive into the world of customer relationship management and start leveraging Salesforce to streamline your business operations. If you need help, Salesforce offers plenty of resources and support to guide you along the way. 🚀
Feel free to reach out if you have any questions or need further assistance!
How to Create an Account on Salesforce: A Beginner’s Guide
Salesforce is a leading Customer Relationship Management (CRM) platform that helps businesses streamline their operations, enhance customer interactions, and drive growth. Whether you’re a small business owner or part of a larger enterprise, Salesforce offers powerful tools to manage your sales, marketing, and customer service. This comprehensive guide will walk you through the process of creating an account on Salesforce, ensuring you can start leveraging its features effectively.
What to Expect
Before diving into the account creation process, it’s essential to understand what Salesforce offers. As a CRM platform, Salesforce provides a cloud-based solution that integrates various business functions, including sales, customer service, and marketing. Its robust features include customizable dashboards, advanced analytics, and automation tools. By creating a Salesforce account, you gain access to these capabilities, enabling you to manage customer relationships more efficiently and make data-driven decisions.
Step 1: Visit the Salesforce Website
The first step in creating your Salesforce account is to visit the official Salesforce website. Open your preferred web browser and navigate to Salesforce’s homepage. Once there, you will find options to sign up or start a free trial.
Click on the “Sign Up” or “Try for Free” button, which is typically located in the top right corner of the page. This will direct you to the registration page where you can begin the process of creating your account.
Step 2: Choose Your Salesforce Edition
Salesforce offers different editions tailored to various needs and organization sizes. It’s crucial to select the edition that best aligns with your business requirements. Here’s a brief overview of the available editions:
- Salesforce Essentials: Ideal for small businesses, offering core CRM features to help you manage customer relationships effectively.
- Salesforce Professional: Suitable for growing businesses that need more advanced customization and automation options.
- Salesforce Enterprise: Designed for larger organizations, providing extensive customization capabilities and advanced analytics.
- Salesforce Unlimited: Offers the most comprehensive set of features, including unlimited customization and premium support.
Choose the edition that fits your needs and click on the corresponding option to proceed.
Step 3: Enter Your Personal Information
Once you’ve selected your edition, the next step is to provide your personal information. This step involves filling out a registration form with the following details:
- Full Name: Enter your first and last name. This information helps Salesforce address you correctly in communications.
- Email Address: Provide a valid email address that you have access to. Salesforce will use this address to send important updates and account verification instructions.
- Phone Number: Input a contact number where Salesforce can reach you if necessary. This information is optional but recommended for account recovery and support purposes.
- Company Name: Enter the name of your company or organization. If you are signing up for personal use, you can use “Personal” or “Self-Employed” as your company name.
- Number of Employees: Select the size of your organization. This information helps Salesforce tailor its recommendations and services to your specific needs.
After filling out the required fields, click on the “Next” button to move on to the next step.
Step 4: Create a Strong Password
A crucial step in securing your Salesforce account is creating a strong password. Your password should be both secure and memorable. Follow these guidelines for creating a robust password:
- Include a Mix of Characters: Use uppercase letters, lowercase letters, numbers, and special characters. For example,
S@lesf0rce!2024is a strong password. - Avoid Common Words: Steer clear of easily guessable words or phrases, such as “password” or “123456”.
- Use a Password Manager: Consider using a password manager to securely store and manage your passwords.
Enter your chosen password in the “Password” field and confirm it by entering it again in the “Confirm Password” field. Click “Next” to proceed with the registration process.
Step 5: Accept Terms and Conditions
Before finalizing your account creation, you need to review and accept Salesforce’s terms and conditions. Take the time to read through the terms of service and privacy policy to understand how Salesforce will handle your data and provide services.
Check the box to agree to the terms and conditions, and then click on the “Sign Up” or “Get Started” button. This action will submit your registration and initiate the account creation process.
Step 6: Verify Your Email Address
After completing the registration, Salesforce will send a verification email to the address you provided. Check your email inbox for a message from Salesforce with a subject line similar to “Verify Your Salesforce Account.”
Open the email and click on the verification link included in the message. This step is necessary to activate your account and ensure the security of your registration. Once you’ve verified your email address, you will receive a confirmation message, and your Salesforce account will be activated.
Step 7: Log In and Explore Salesforce
With your account successfully created and verified, you can now log in to Salesforce. Return to the Salesforce login page and enter your email address and password.
After logging in, you will be greeted with the Salesforce dashboard. This is your gateway to exploring Salesforce’s powerful features. Take advantage of Salesforce’s tutorials and resources to familiarize yourself with the platform’s capabilities. You can start by customizing your dashboard, setting up user profiles, and integrating other tools that align with your business needs.
Conclusion
Creating an account on Salesforce is a straightforward process that unlocks a wealth of CRM capabilities designed to enhance your business operations. By following the steps outlined in this guide, you can set up your Salesforce account and begin leveraging its features to manage customer relationships effectively.
Salesforce offers a variety of editions to cater to different business sizes and needs. By choosing the right edition, providing accurate information, and creating a secure password, you ensure a smooth account setup experience. Once your account is active, take time to explore Salesforce’s features and resources to make the most out of your CRM investment.
If you have any questions or need further assistance during the account creation process, Salesforce provides comprehensive support and documentation to help you along the way. Welcome to Salesforce, and best of luck in optimizing your business operations with this powerful CRM tool!
you may be interested in this blog here:-
Pin Up Casino Nun Zahiri Saytı Bonus 700 Azn + 250 Frispin Identificacion
ABAP on SAP HANA. Part IX- Are Native SQL and Open SQL Competitors?


