I’ll walk you through setting up a Jenkins server that is integrated with the key components required to build a reliable DevSecOps Tools pipeline in this blog article. This course is intended for people who have a basic understanding of using the AWS console.
Requirement:
Free Tier Account on AWS
Step 1: Installing Jenkin, Docker, Trivy, Sonarqube, Terraform, AWS CLI, and Kubectl on an EC instance and setting up Jenkin Server.
Put Jenkin in place
1.1) Start an EC2 instance and attach the administrator access policy. In my instance, I’m using instance type T2 Large and AMI Ubuntu 22.04.
1.2) Set up the EC2 instance we created before with the Jenkins, Docker, and Trivy tools. Create a Jenkins.sh script file with the following code after logging in to an EC2 instance using an SSH client.
#!/bin/bash
sudo apt update -y
wget -O - https://packages.adoptium.net/artifactory/api/gpg/key/public | tee /etc/apt/keyrings/adoptium.asc
echo "deb [signed-by=/etc/apt/keyrings/adoptium.asc] https://packages.adoptium.net/artifactory/deb $(awk -F= '/^VERSION_CODENAME/{print$2}' /etc/os-release) main" | tee /etc/apt/sources.list.d/adoptium.list
sudo apt update -y
sudo apt install temurin-17-jdk -y
/usr/bin/java --version
curl -fsSL https://pkg.jenkins.io/debian-stable/jenkins.io-2023.key | sudo tee \
                  /usr/share/keyrings/jenkins-keyring.asc > /dev/null
echo deb [signed-by=/usr/share/keyrings/jenkins-keyring.asc] \
                  https://pkg.jenkins.io/debian-stable binary/ | sudo tee \
                              /etc/apt/sources.list.d/jenkins.list > /dev/null
sudo apt-get update -y
sudo apt-get install jenkins -y
sudo systemctl start Jenkins
After creating script.sh file, give the permission for execution and execute the script file. This will install Jenkins into you EC2 instance.
sudo chmod 777 jenkins.sh
sudo su   #move into root and run
./jenkins.sh    # this will installl jenkins
After installing Jenkins, proceed to open inbound port 8080 on your AWS EC2 Security Group, as Jenkins operates on this port. Now, grab your Public IP Address
sudo cat /var/lib/jenkins/secrets/initialAdminPassword
To proceed, unlock Jenkins using the administrative password and install the recommended plugins.
Jenkins will now install and configure all required libraries.
Create a user, click “Save,” and proceed.
Install Docker
1.3) Execute the below command to install docker on same EC2 instance.
sudo apt-get update
sudo apt-get install docker.io -y
sudo usermod -aG docker $USER   #my case is ubuntu
newgrp docker
sudo chmod 777 /var/run/docker.sock
1.4) After the docker installation, we create a sonarqube container (Remember to add 9000 ports in the security group).
docker run -d --name sonar -p 9000:9000 sonarqube:lts-community
Now our Sonarqube is up and running
![]()
Now grab the public ip of EC2 instance and access the Sonarqube login page on port 9000.
Enter username and password as admin/admin, click on login and change password.
1.5) Install Trivy, Kubectl,Terraform
Create the one more script file name it script.sh and copy the below script into the file and run it, it will install Terraform, Trivy, Kubectl, AWS cli.
#!/bin/bash
sudo apt-get install wget apt-transport-https gnupg lsb-release -y
wget -qO - https://aquasecurity.github.io/trivy-repo/deb/public.key | gpg --dearmor | sudo tee /usr/share/keyrings/trivy.gpg > /dev/null
echo "deb [signed-by=/usr/share/keyrings/trivy.gpg] https://aquasecurity.github.io/trivy-repo/deb $(lsb_release -sc) main" | sudo tee -a /etc/apt/sources.list.d/trivy.list
sudo apt-get update
sudo apt-get install trivy -y
# Install Terraform
sudo apt install wget -y
wget -O- https://apt.releases.hashicorp.com/gpg | sudo gpg --dearmor -o /usr/share/keyrings/hashicorp-archive-keyring.gpg
echo "deb [signed-by=/usr/share/keyrings/hashicorp-archive-keyring.gpg] https://apt.releases.hashicorp.com $(lsb_release -cs) main" | sudo tee /etc/apt/sources.list.d/hashicorp.list
sudo apt update && sudo apt install terraform
# Install kubectl
sudo apt update
sudo apt install curl -y
curl -LO https://dl.k8s.io/release/$(curl -L -s https://dl.k8s.io/release/stable.txt)/bin/linux/amd64/kubectl
sudo install -o root -g root -m 0755 kubectl /usr/local/bin/kubectl
kubectl version --client
# Install AWS CLI
curl "https://awscli.amazonaws.com/awscli-exe-linux-x86_64.zip" -o "awscliv2.zip"
sudo apt-get install unzip -y
unzip awscliv2.zip
sudo ./aws/install
Give permissions and run script.
sudo chmod 777 script.sh
./script.sh
Next, we will login to Jenkins and start to configure our required tools in Jenkins.
Step2: Install Plugins like JDK, Sonarqube Scanner, NodeJs, OWASP Dependency Check
2.1) Install Plugin
Goto Manage Jenkins -> Plugins -> Available Plugins -> Install below plugins.
| 1. Blue ocean | 8. Docker API |
| 2. Eclipse Temurin Installer | 9. Docker Build step |
| 3. SonarQube Scanner | 10. Owasp Dependency Check |
| 4. NodeJs Plugin | 11. Kubernetes |
| 5. Docker | 12. Kubernetes CLI |
| 6. Docker commons | 13. Kubernetes Client API |
| 7. Docker pipeline | 14. Kubernetes Pipeline DevOps steps |
2.2) Set up Node.js and Java in the Global Tool Configuration
Select Manage Jenkins -> Tools -> JDK (17) and NodeJs (19) -> Install. Select “Apply and Save.”
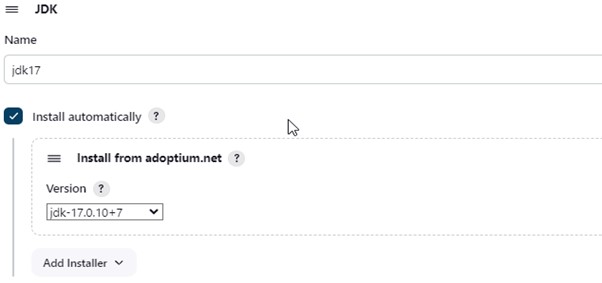
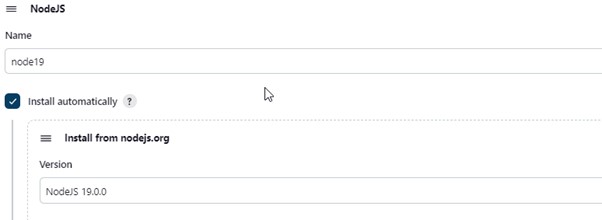
Take note of your EC2 instance’s public IP address. Sonarqube operates on port 9000, so:9000. Navigate to the Sonarqube server.
2.3) Select Users -> Security -> Administration. After selecting Tokens and Updating Token, giving it a name, and selecting Generate Token

After giving your token a name, click “Generate.” Copy the generated token now.

2.4) Select Manage Jenkins -> Credentials -> Add Secret Text from the Jenkins Dashboard. This is how it ought to seem.
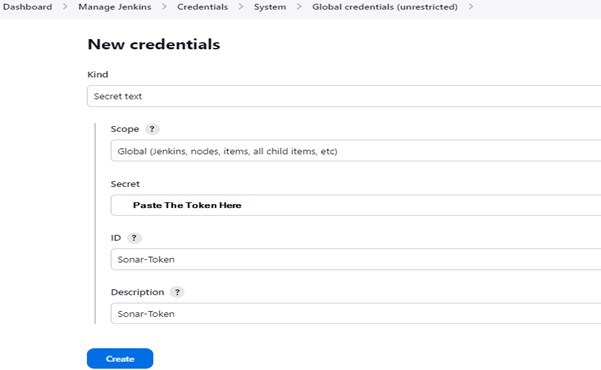
You will see this page once you click on create.

2.5) Now, go to Dashboard -> Manage Jenkins -> System and Add, like the below image.
Select “Apply and Save” after that.
2.6) The sonar scanner will now be installed in the tools. Navigate to SonarQube Scanner under Tools -> Manage Jenkins.
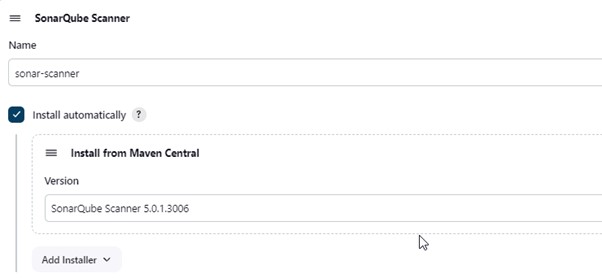
2.7) Click Create in the Administration -> Configuration -> Webhooks section of the Sonarqube Dashboard to add a quality gate as well.
The URL for the test is http://:8080/sonarqube-webhook.
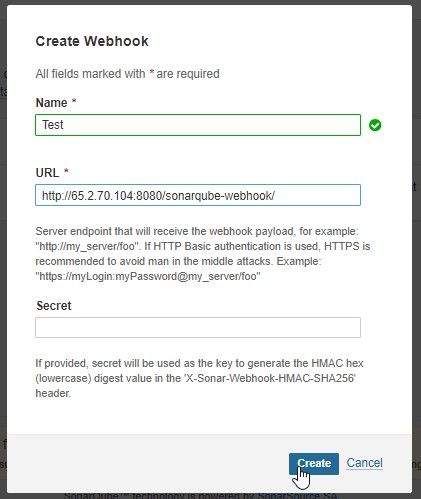
Go to the Projects part of the Sonarqube Server in order to read the report.
First, we set up the tool and then setup the plugin.
2.8) Select Dependency-Check Installation from the Tools menu under Dashboard -> Manage Jenkins.
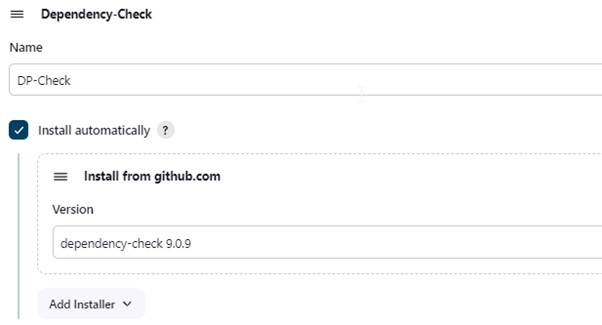
Here, select Apply and Save.
2.9) Select Docker Installation from Dashboard -> Manage Jenkins -> Tools.
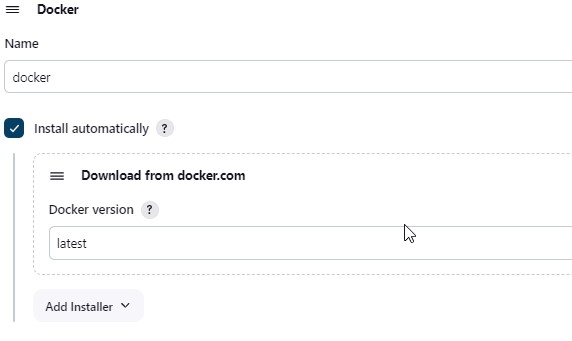
2.10) Tools –> Terraform add this, use the following command in Jenkins to update the path of the Terraform installation on the EC2 instance.
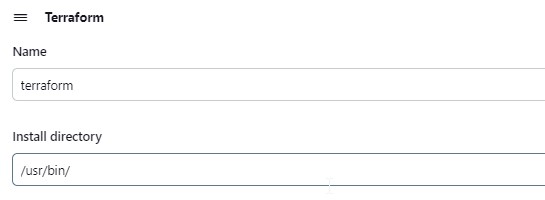
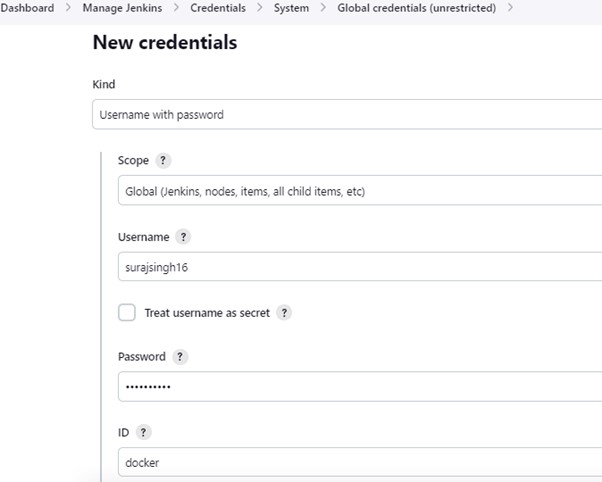
2.11) Select Credentials under Manage Jenkins.
Add the password and username for DockerHub under Global Credentials.
We are ready to start building our DevSecOps pipeline for deployment now that our Jenkins server is configured to perfection. DevSecOps Tools, devsecops tools list, best devsecops tools,best devsecops tools, devsecops tools open source.
you may be interested in this blog here:-


